About cookies on this site Our websites require some cookies to function properly (required). In addition, other cookies may be used with your consent to analyze site usage, improve the user experience and for advertising. For more information, please review your options. By visiting our website, you agree to our processing of information as described in IBM’sprivacy statement. To provide a smooth navigation, your cookie preferences will be shared across the IBM web domains listed here.
Last updated: Nov 21, 2024
Download a pre-populated project with the assets that you need to run a sample pipeline. The pipeline compares two AutoAI experiments and compares the output, selecting the best model and deploying it as a web service.
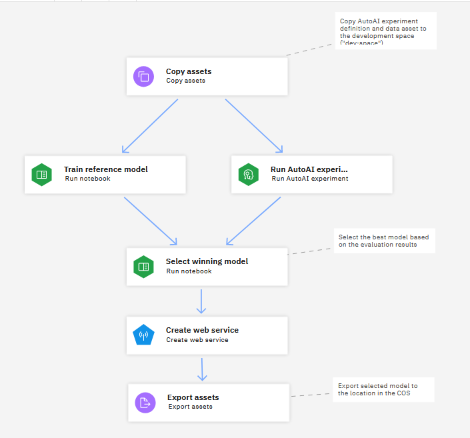
The sample Train AutoAI and reference model creates a pre-populated project with the assets that you need to run a pre-built pipeline that trains models by using a sample data set. After the setup and configuration tasks, you can run the sample pipeline to automate the following sequence:
- Copy sample assets into a space.
- Run a notebook and an AutoAI experiment simultaneously, on a common training data set.
- Run another notebook to compare the results from the previous nodes and select the best model, ranked for accuracy.
- Copy the winning model to a space and create a web service deployment for the selected model.
After the run completes, you can inspect the output in the pipeline editor, and then switch to the associated deployment space to view and test the resulting deployment.
Learning goals
After running this sample, you will know how to:
- Configure a Pipelines
- Run a Pipelines
Downloading the sample
Follow these steps to create the sample project from the Resource hub so you can test the capabilities of IBM Orchestration Pipelines:
- Open the Train AutoAI and reference model sample from the Resource hub.
- Click Create project to create the project.
- Open the project and follow the instructions on the in the Readme file to set up the pipeline assets.
The sample pipeline components
The sample project includes:
- Pre-built sample Pipelines
- Data set called
german_credit_data_biased_training.csv - Data set called
german_credit_test_data.csv - Notebook called
reference-model-training-notebook - Notebook called select-winning-model that compares the models and chooses the best to save to the designated deployment space
Getting started with the sample
To run the sample pipeline, you need to do these setup tasks:
-
Create a deployment space, for example, dev-space which you need when you run the notebooks. From the navigation menu, select Deployments > View All Spaces > New deployment space. Complete the required fields.
Note:Make sure you associate a watsonx.ai Runtime instance with the space or the pipeline run will fail.
-
From the Assets page of the sample project, open the reference-model-training-notebook and follow the steps in the Set up the environment section to acquire and insert an api_key variable as your credentials.
-
After you insert your credentials, click File > Save as version to save the updated notebook to your project.
-
Do the same for the select-winning-model notebook to add credentials and save the updated version of the notebook.
Exploring the pipeline
After you complete the set up tasks, open the sample pipeline On-boarding - Train AutoAI and reference model and select the best from the Assets page of the sample project.
You will see the sample pipeline:
Viewing node configuration
As you explore the sample pipeline, double-click the various nodes to view their configuration. For example, if you click the first node for copying an asset, you will see this configuration:
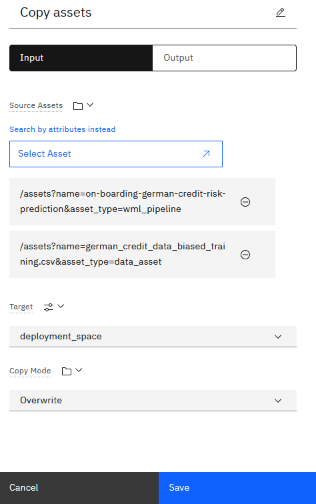
The node that copies the data asset to a deployment space is configured by using a pipeline parameter. The pipeline parameter creates a placeholder for the space that you created to use for this pipeline. When you run the pipeline, you are prompted to choose the space.
Running the pipeline
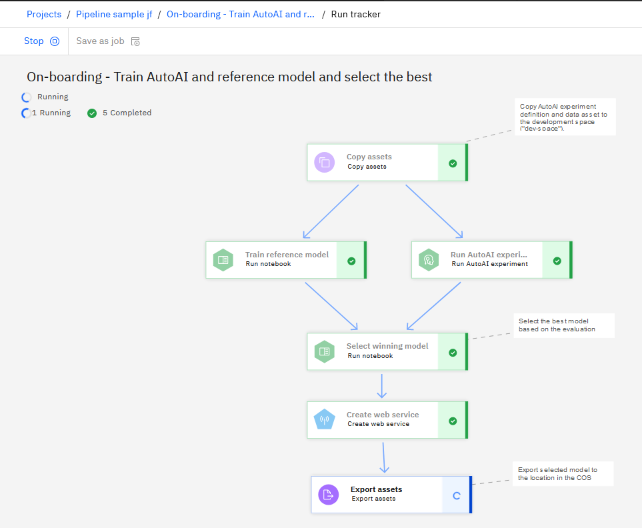
When you are ready to run the pipeline, click the Run icon and choose Trial job. You are prompted to choose the deployment space for the pipeline and create or supply an API key for the pipeline if one is not already available.
As the pipeline runs, you will see status notifications about the progress of the run. Nodes that are processed successfully are marked with a checkmark.
Viewing the output
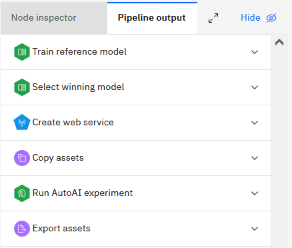
When the job completes, click Pipeline output for the run to see a summary of pipeline processes. You can click to expand each section and view the details for each operation.
Viewing the deployment in your space
After you are done exploring the pipeline and its output, you can view the assets that were created in the space you designated for the pipeline.
Open the space. You can see that the models and training data were copied to the space. The winning model is tagged as selected_model.

Viewing the deployment
The last step of the pipeline created a web service deployment for the selected model. Click the Deployments tab to view the deployment.

Testing the deployment
You can test the deployment to see the predictions that the model generates.
- Click the deployment name to view the details.
- Click the Test tab.
- Enter this JSON data into the Input form. The payload (input) must match the schema for the model but do not include the prediction column.
{"input_data":[{
"fields": ["CheckingStatus","LoanDuration","CreditHistory","LoanPurpose","LoanAmount","ExistingSavings","EmploymentDuration","InstallmentPercent","Sex","OthersOnLoan","CurrentResidenceDuration","OwnsProperty","Age","InstallmentPlans","Housing","ExistingCreditsCount","Job","Dependents","Telephone","ForeignWorker"],
"values": [["no_checking",28,"outstanding_credit","appliances",5990,"500_to_1000","greater_7",5,"male","co-applicant",3,"car_other",55,"none","free",2,"skilled",2,"yes","yes"]]
}]}
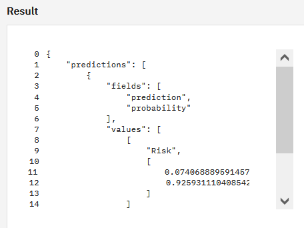
Clicking Predict returns this prediction, indicating a low credit risk for this customer.
Next steps
Create a pipeline by using your own assets.
Parent topic: Pipelines