Create a pipeline to run an end-to-end scenario to automate all or part of the AI lifecycle. For example, create a pipeline that creates and trains an asset, promotes it to a space, creates a deployment, then scores the model.
Watch this video to see how to create and run a sample pipeline.
This video provides a visual method to learn the concepts and tasks in this documentation.
Overview: Adding a pipeline to a project
Follow these steps to add a pipeline to a project:
-
Open a project.
-
Click New asset > Automate model lifecycles.
-
Enter a name and an optional description.
-
Click Create to open the canvas.
Pipeline access
When you use a pipeline to automate a flow, you must have access to all of the elements in the pipeline. Make sure that you create and run pipelines with the proper access to all assets, projects, and spaces used in the pipeline.
Overview: Building a pipeline
Follow these high-level steps to build and run a pipeline.
- Drag any node objects onto the canvas. For example, drag a Run notebook job node onto the canvas.
- Use the action menu for each node to view and select options.
- Configure a node as required. You are prompted to supply the required input options. For some nodes, you can view or configure output options as well. For examples of configuring nodes, see Configuring pipeline components.
- Drag from one node to another to connect and order the pipeline.
- Optional: Click the
 in the toolbar to configure runtime options for the pipeline.
 - When the pipeline is complete, click the Run icon on the toolbar to run the pipeline. You can run a trial to test the pipeline, or you can schedule a job when you are confident in the pipeline.
Configuring nodes
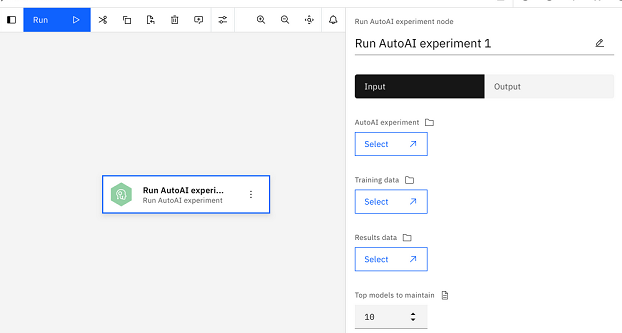
As you add nodes to a pipeline, you must configure them to provide all of the required details. For example, if you add a node to run an AutoAI experiment, you must configure the node to specify the experiment, load the training data, and specify the output file:
Connecting nodes
When you build a complete pipeline, the nodes must be connected in the order in which they run in the pipeline. To connect nodes, hover over a node and drag a connection to the target node. Disconnected nodes are run in parallel.

You can re-link nodes by dragging the links on canvas from one node to another. General conditions attached to the links will refer to the new node, including conditions that refer to node status.
Change the connection between nodes can result in errors. Error messages will notify if you must update the node configuration. For example, if you refer to an inaccessible node, this will result in an error.
Deleting a node with links
When you delete a node that has links to a previous and sequential node, these nodes are automatically joined with a new link after the transitive node is deleted.
Defining pipeline parameters
A pipeline parameter defines a global variable for the whole pipeline. Use pipeline parameters to specify data from one of these categories:
| Parameter type | Can specify |
|---|---|
| Basic | JSON types such as string, integer, or a JSON object |
| CPDPath | Resources available within the platform, such as assets, asset containers, connections, notebooks, hardware specs, projects, spaces, or jobs |
| InstanceCRN | Storage, machine learning instances, and other services. |
| Other | Various configuration types, such as status, timeout length, estimator, error policies and other various configuration types. |
To specify a pipeline parameter:
- Click the global objects icon in the toolbar to open the Manage global objects window.
- Select the Pipeline parameters tab to configure parameters.
- Click Add pipeline parameter.
- Specify a name and an optional description.
- Select a type and provide any required information.
- Click Add when the definition is complete, and repeat the previous steps until you finish defining the parameters.
- Close the Manage global objects dialog.
The parameters are now available to the pipeline.
Next steps
Parent topic: IBM Orchestration Pipelines