About cookies on this site Our websites require some cookies to function properly (required). In addition, other cookies may be used with your consent to analyze site usage, improve the user experience and for advertising. For more information, please review your options. By visiting our website, you agree to our processing of information as described in IBM’sprivacy statement. To provide a smooth navigation, your cookie preferences will be shared across the IBM web domains listed here.
Last updated: Nov 27, 2024
This tutorial demonstrates the use of Federated Learning with the goal of training a machine learning model with data from different users without having users share their data. The steps are done in a low code environment with the UI and with an XGBoost framework. Using the UCI: Adult - Predict income data set, the trained model predicts whether income exceeds $50K/yr based on census data. The data set is also known as the "Census Income" dataset.
In this tutorial, you will complete these tasks:
- Task 1: Start Federated Learning as the admin
- Task 2: Train model as a party
- Task 3: Save and deploy the model online
- Task 4: Score the model
Notes:
- This is a step-by-step tutorial for running a UI driven Federated Learning experiment. To see a code sample for an API driven approach, go to Federated Learning XGBoost samples.
- In this tutorial, admin refers to the user that starts the Federated Learning experiment, and party refers to one or more users who send their model results after the experiment is started by the admin. While the tutorial can be done by the admin and multiple parties, a single user can also complete a full run through as both the admin and the party. For a simpler demonstrative purpose, in the following tutorial only one data set is submitted by one party. For more information on the admin and party, see Terminology.
Prerequisites
Verify the Python version
Ensure that you are using the same Python version as the admin. Using a different Python version might cause compatibility issues. To see Python versions compatible with different frameworks, see Frameworks and Python version compatibility.
Open a project
-
Use an existing project or create a new one. You must have at least admin permission.
-
Associate the watsonx.ai Runtime service with your project.
- In your project, click the Manage > Service & integrations.
- Click Associate service.
- Select your watsonx.ai Runtime instance from the list, and click Associate; or click New service if you do not have one to set up an instance.

Task 1: Start Federated Learning
In this section, you create, configure, and start a Federated Learning experiment.
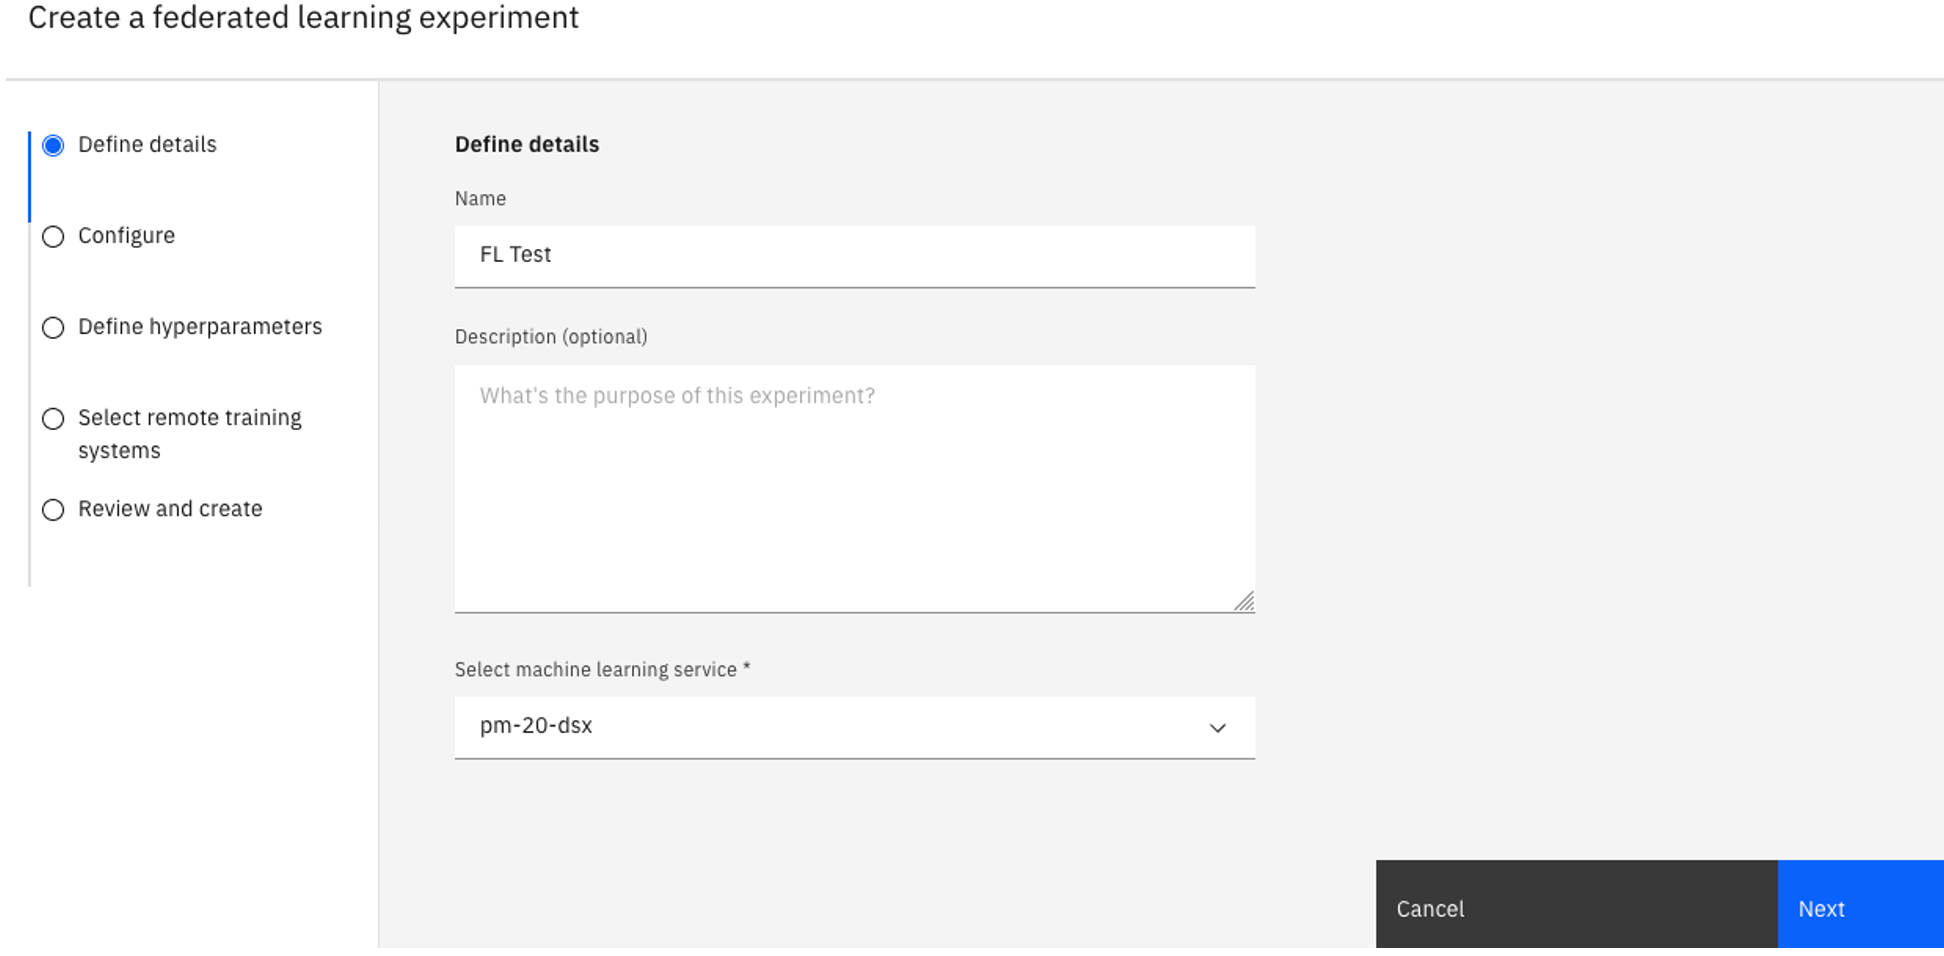
Task 1a: Create the Federated learning experiment asset
-
In your project, click the Assets tab in your project.
-
Click New asset > Train models on distributed data to create the Federated learning experiment asset.
-
Type a Name for your experiment and optionally a description.
-
Verify the associated watsonx.ai Runtime instance under Select a machine learning instance. If you don't see a watsonx.ai Runtime instance associated, follow these steps:
-
Click Associate a Machine Learning Service Instance.
-
Select an existing instance and click Associate, or create a New service.
-
Click Reload to see the associated service.
-
Click Next.
-
Task 1b: Configure the experiment
-
On the Configure page, select a Hardware specification.
-
Under the Machine learning framework dropdown, select scikit-learn.
-
For the Model type, select XGBoost.
-
For the Fusion method, select XGBoost classification fusion.

-
Click Next.
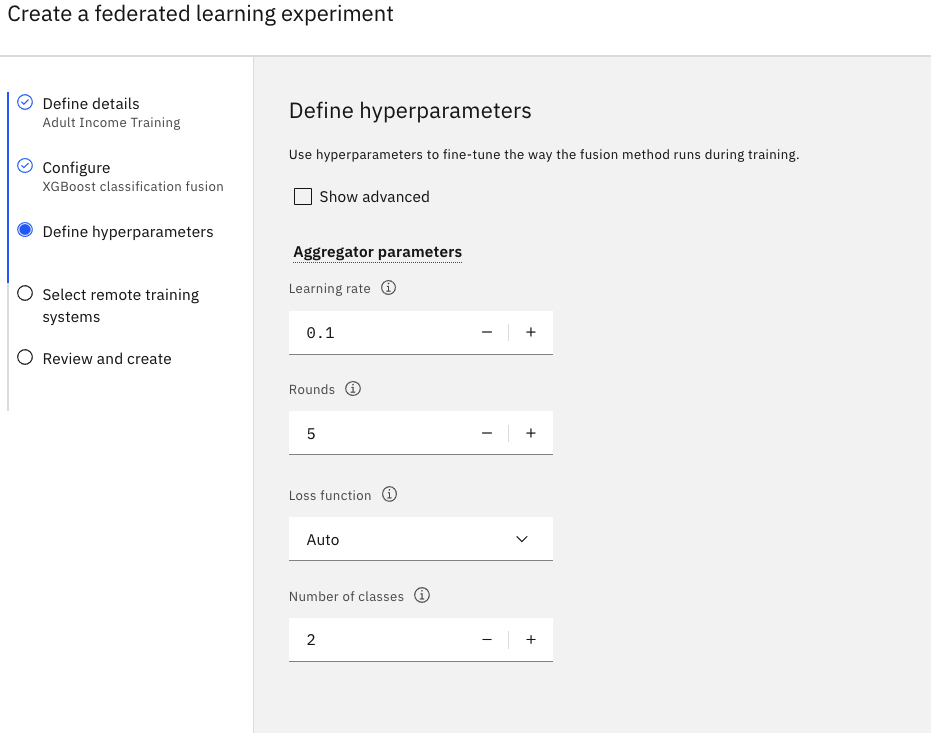
Task 1c: Define the hyperparameters
-
Set the value for the Rounds field to
5 -
Accept the default values for the rest of the fields.
-
Click Next.
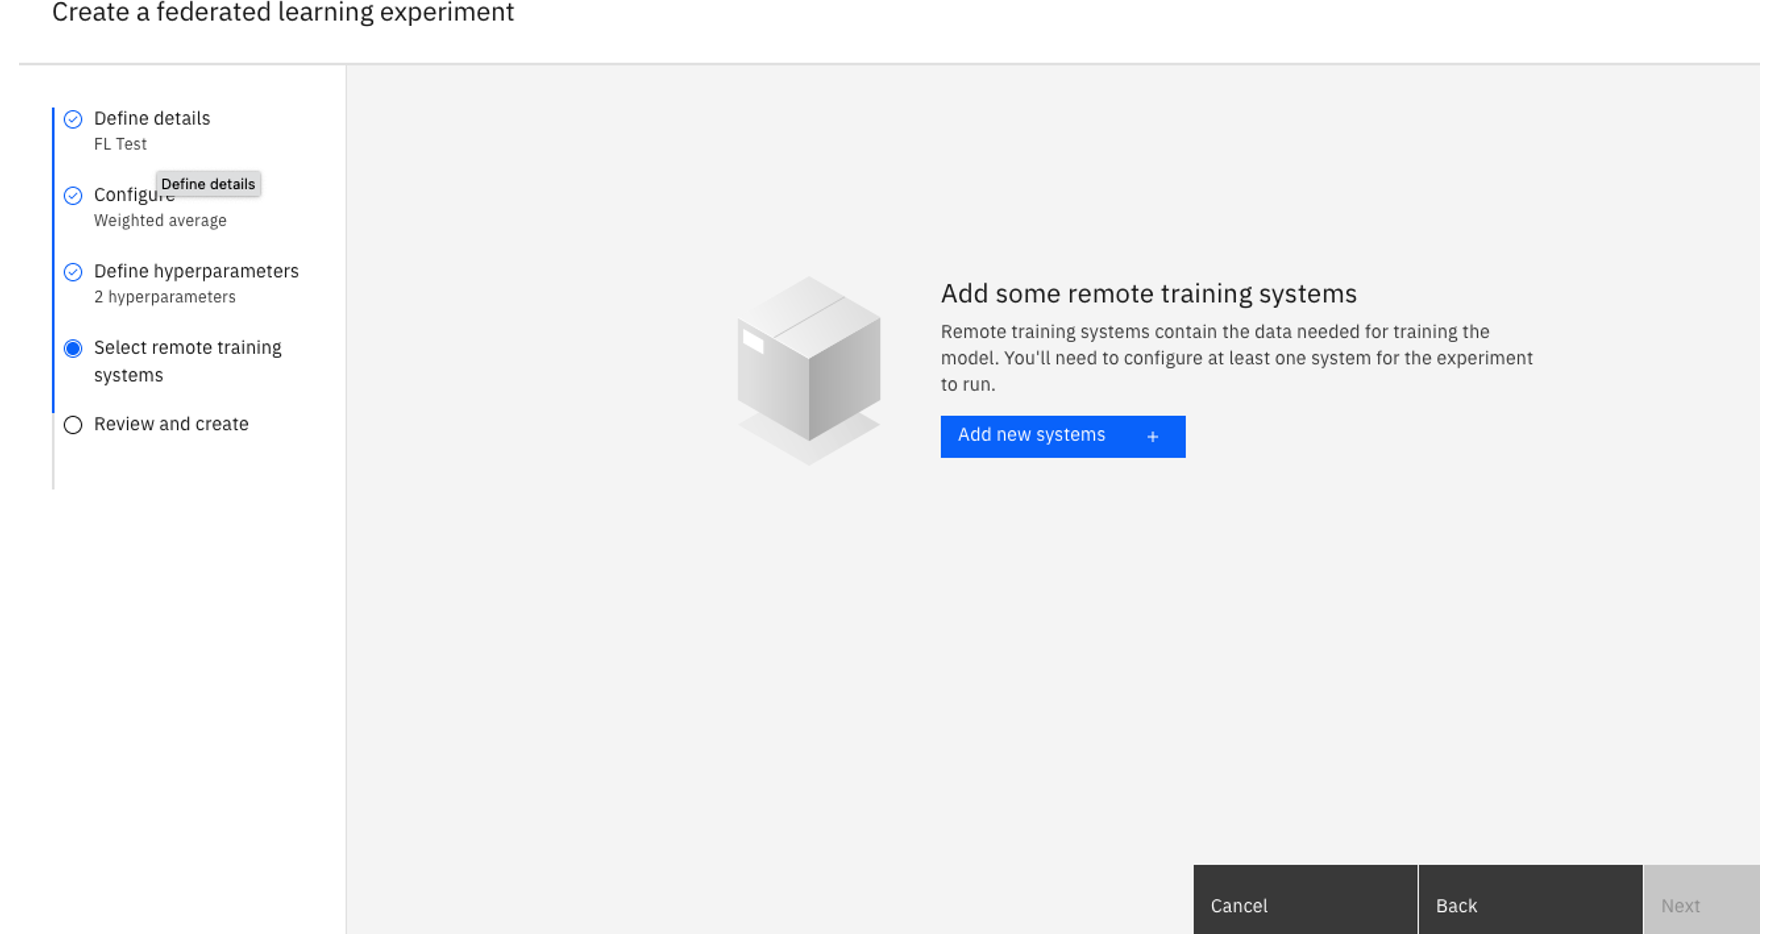
Task 1d: Select remote training systems
-
Click Add new systems.
-
Type a name for your Remote Training System.
-
Under Allowed identities, select the user that will participate in the experiment, and then click Add. You can add as many allowed identities as participants in this Federated Experiment training instance. For this tutorial, choose only yourself.
Any allowed identities must be a collaborator of the project and have at least Admin permission. Add additional systems by repeating this step for each remote party you intent to use. -
When you are finished, click Add systems.

-
Return to the Select remote training systems page, verify that your system is selected, and then click Next.

Task 1e: Review the settings
-
Review your settings, and then click Create.
-
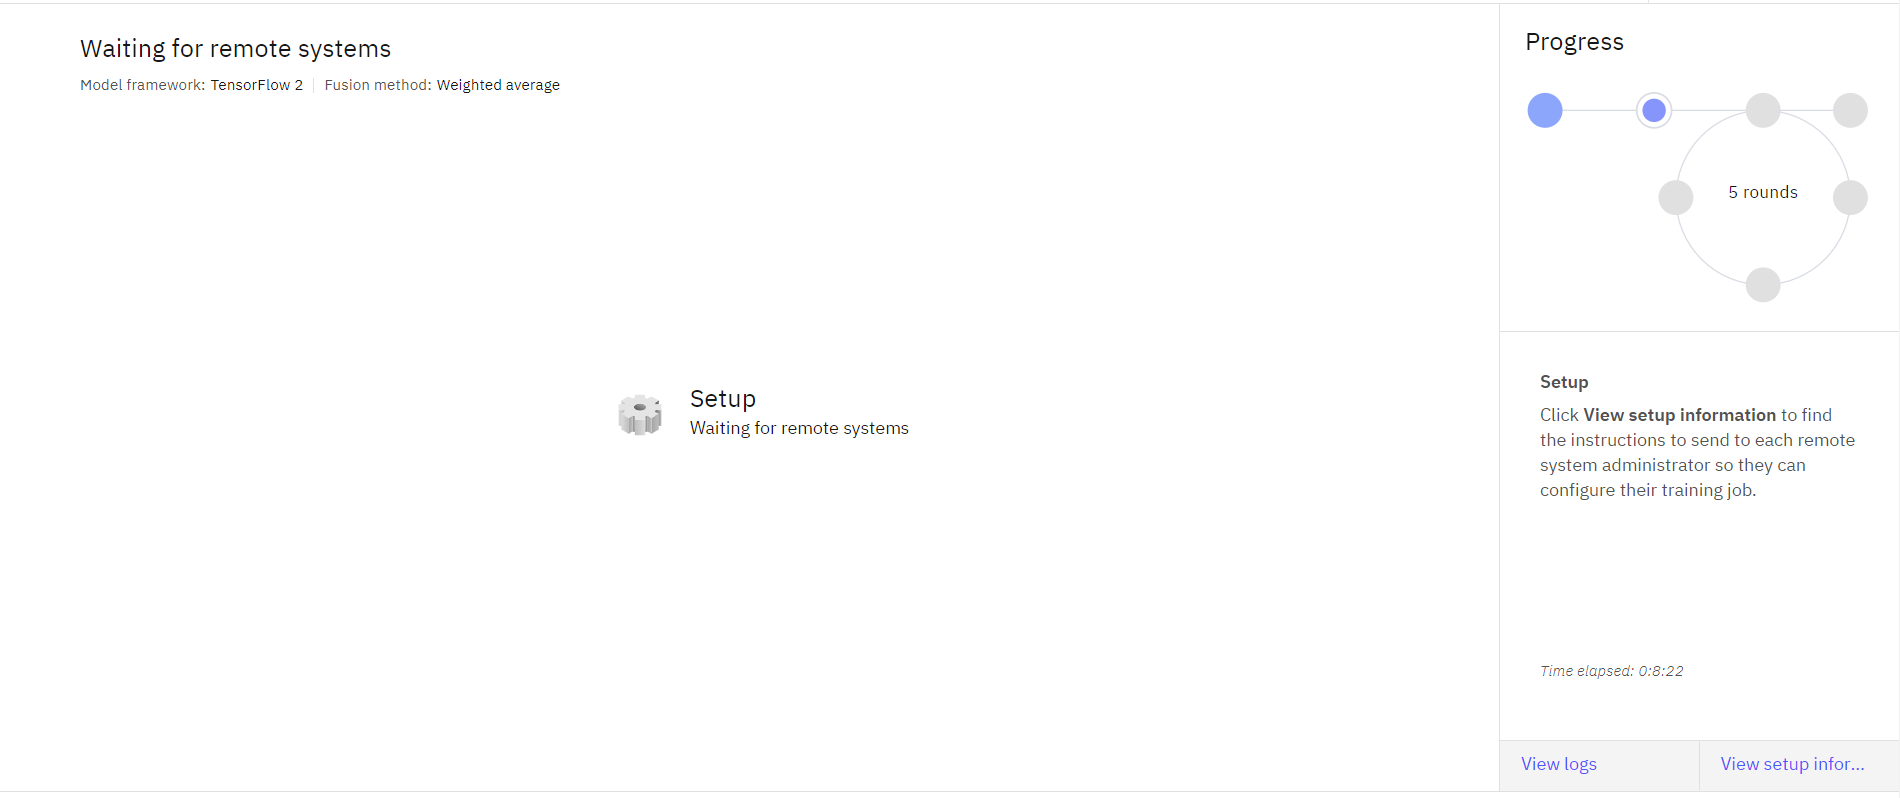
Watch the status. Your Federated Learning experiment status is Pending when it starts. When your experiment is ready for parties to connect, the status will change to Setup – Waiting for remote systems. This may take a few minutes.
-
Click View setup information to download the party configuration and the party connector script that you can run on the remote party.
-
Click the Download config icon
 beside each of the remote training systems
that you created. Save the party connector script to a directory on your machine with the name:
beside each of the remote training systems
that you created. Save the party connector script to a directory on your machine with the name:remote-test-system-configuration.py
-
Click Done.
 Check your progress
The following image shows the experiment with status 'waiting for remote systems'.
Task 2: Train model as a party
To train the model, you need to download the data sets, and then edit and run python scripts. Follow these steps to train the model as a party:
Task 2a: Download the data sets and scripts
-
Create a new local directory, and put move the party connector script that you downloaded in Task 1e into the new directory.
-
Download the following files by right-clicking on the file name, and then click Save link as. Save it to the same directory as the party connector script.
-
Verify that you have the party connector script, the Adult data set, the data handler, and the log configuration file in the same directory. If you list the files in the directory, you should see these files:
adult.csv adult_sklearn_data_handler.py remote-test-system-configuration.py log_config.yaml
Task 2b: Install watsonx.ai Runtime
-
If you are using Windows or Linux, run
pip install 'ibm_watsonx_ai[fl-rt23.1-py3.10]' -
If you are using Mac OS with M-series CPU and Conda, download the installation script and then run
./install_fl_rt23.1_macos.sh <name for new conda environment>
Task 2c: Edit and run the party connector script
Edit the party connector file, remote-test-systm-configuration.py
-
Add the following code as the second line of the python file.
log_config_path = "log_config.yaml" -
Provide your credentials: Paste the API key for the user defined in the remote training system. If you don't have an API key, go to the IBM Cloud API keys page, and click Create API key, fill out the fields, and click Create.
-
For the party_metadata field, provide the name, path, and info, which should be similar to the following JSON text.
party_metadata = { wml_client.remote_training_systems.ConfigurationMetaNames.DATA_HANDLER: { "info": {"txt_file": "./adult.csv"}, "name": "AdultSklearnDataHandler", "path": "./adult_sklearn_data_handler.py" } }where:
namepathinfo
-
Save the party connector script.
-
Run the party connector script using either
pythonpython3python remote-test-system-configuration.py
From the UI you can monitor the status of your Federated Learning experiment. When all participating parties connect to the aggregator, the aggregator facilitates the local model training and global model update. Its status is Training.
You can monitor the status of your Federated Learning experiment from the user interface. When training is complete, the party receives a Received STOP message
Check your progress
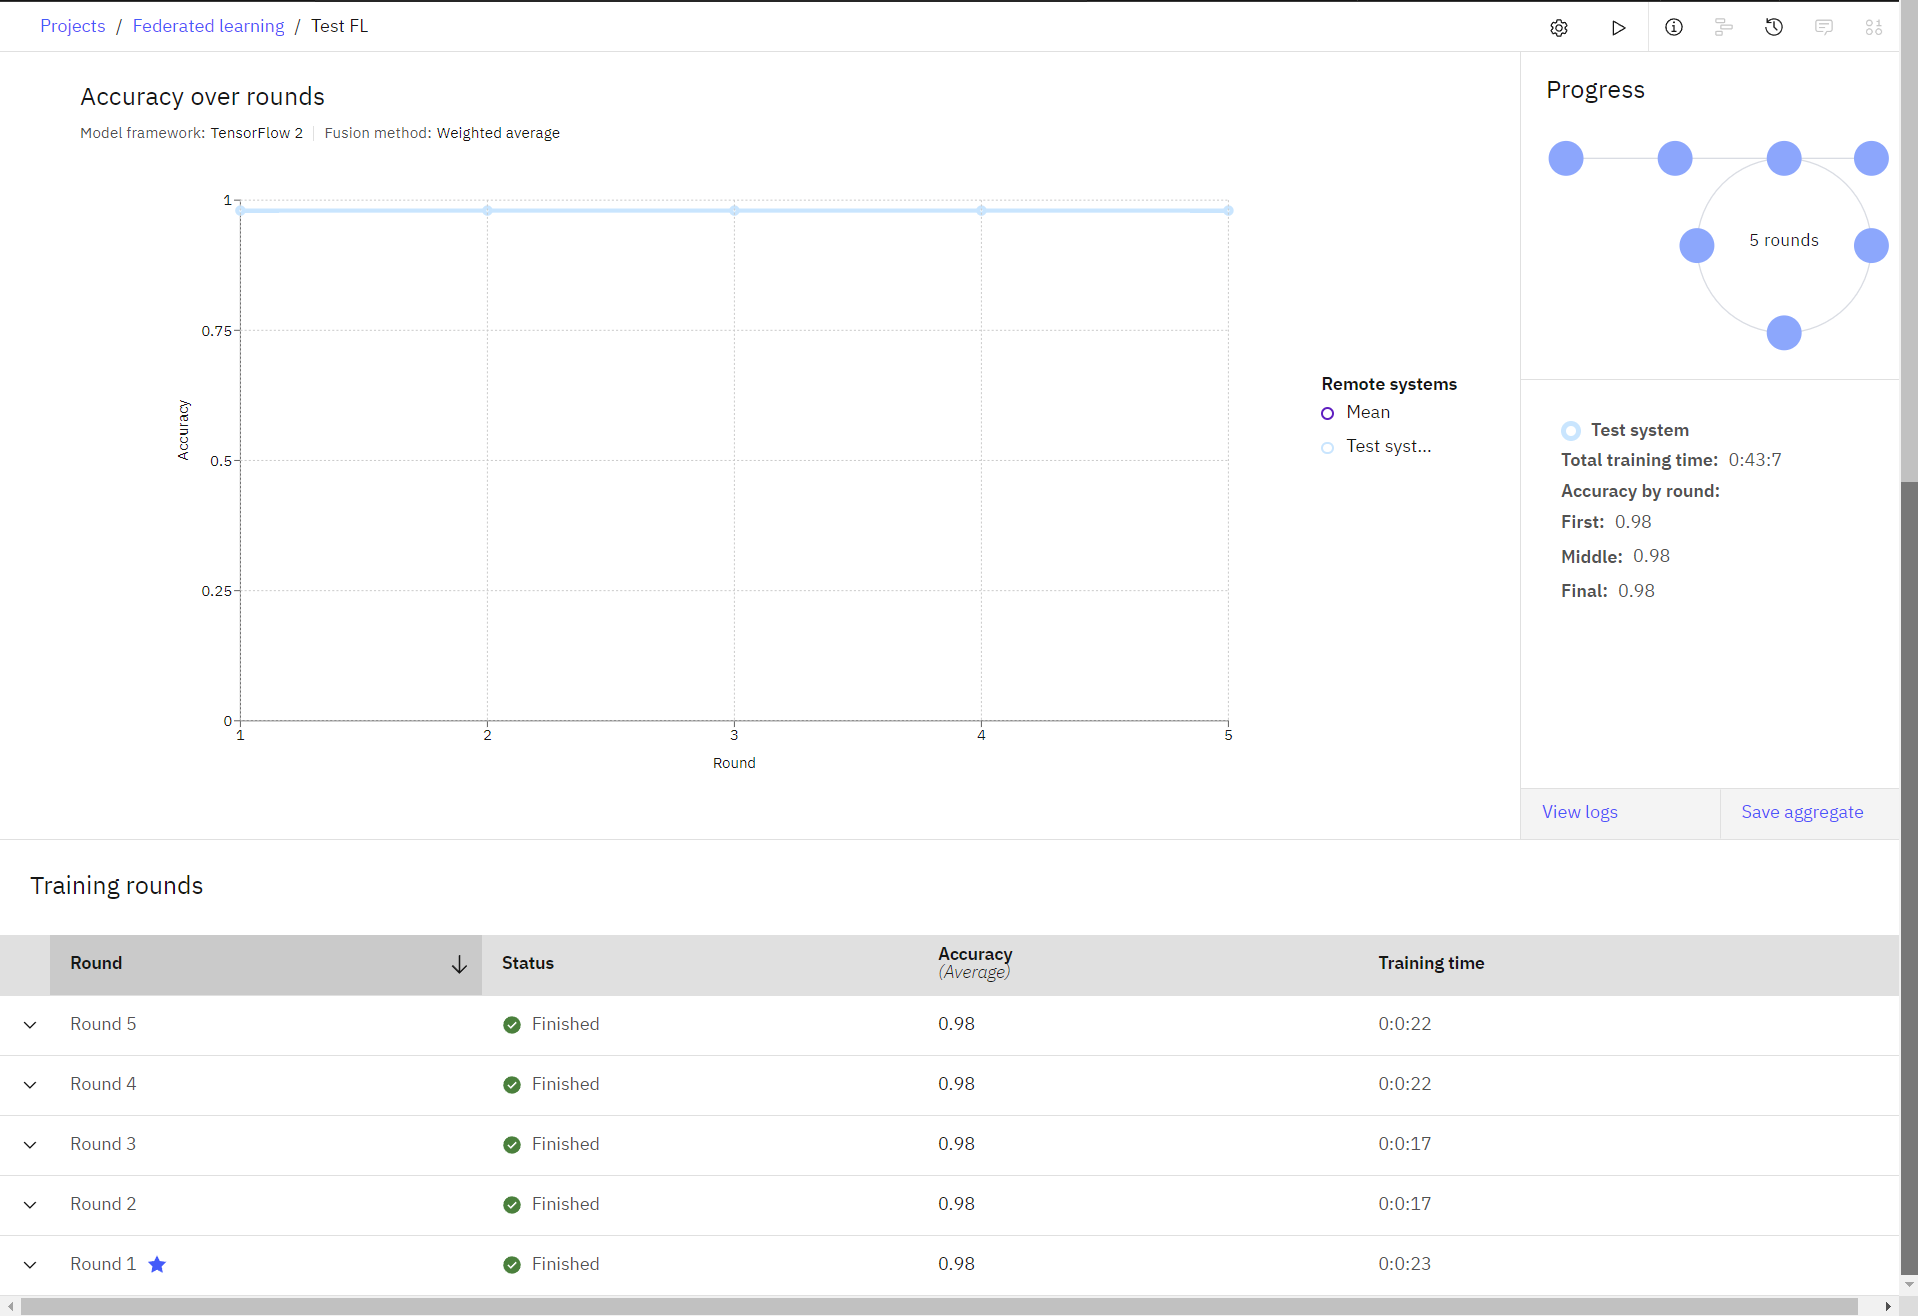
The following image shows the completed experiment.
Task 3: Save and deploy the model online
In this section, you learn how to save and deploy the model that you trained.
Task 3a: Save your model
- In your completed Federated Learning experiment, click Save aggregate.
- On the Save aggregated model to project screen, type a name for the model. and click Create.
- When you see the notification that the model is created, click View in project. If you miss the notification, then click the project name to return to the assets tab, and click the model name to view it.
Task 3b: Promote the model to a space
- In the Models section, click the model to view its details page.
- Click Promote to deployment space
 .
. - Choose a Target space from the list, or create a new deployment space.
-
Select Create a new deployment space.
-
Type a name for the deployment space.
-
Select your storage service.
-
Select your machine learning service.
-
Click Create.
-
When the deployment space is created, close the window.
-
- Select the Go to the model in the space after promoting it option.
- Click Promote.
Task 3c: Create and view the online deployment
- When the model displays inside the deployment space, click New deployment.
- Select Online as the Deployment type.
- Specify a name for the deployment.
- Click Create.
- Wait for the deployment status to change to Deployed, and then click the deployment name.
- View the endpoints and code snippets to use this deployment in your application.
Check your progress
The following image shows the online deployment,

Task 4: Score the model
In this section, you learn how to create a Python function to process the scoring data to ensure that it is in the same format that was used during training. For comparison, you will also score the raw data set by calling the Python function that we created.
You can create a Python script and run the script locally, or you can create a Jupyter notebook and run the code in the notebook.
Set up the environment
This code imports the necessary library and package and sets the credentials to access the machine learning API client.
# import the library and package and set the credentials
from ibm_watsonx_ai import APIClient
wml_credentials = {
"url": "https://us-south.ml.cloud.ibm.com",
"apikey": "<insert-api-key-here>"
}
client = APIClient(wml_credentials)
client.set.default_space('<insert-deployment-space-id-here>')
software_spec_id = client.software_specifications.get_id_by_name('default_py3.10')
- Paste your IBM Cloud API key in the
apikey - Paste your deployment space ID. Follow these steps to find the deployment space ID.
- Navigate to your deployment spaces.
- Open your deployment space.
- Click the Manage tab.
- Copy the Space GUID, and paste it in place of
<insert-deployment-space-id-here>
Load the data set
This code reads the data set, which is stored in the Resource hub.
# read the data set
import pandas as pd
import io
import requests
url = "https://api.dataplatform.cloud.ibm.com/v2/gallery-assets/entries/5fcc01b02d8f0e50af8972dc8963f98e/data"
s = requests.get(url).content
adult_csv = pd.read_csv(io.StringIO(s.decode('utf-8')))
adult_csv.head(5)
Create the training data set
This code chooses 10 random rows from the data set for scoring.
# choose 10 random rows for the test data set
training_data = adult_csv.sample(n=10)
training_data.head(10)
Define the function to prepare the traing data
This code defines a function to load the scoring data in its raw format and process the data exactly as it was done during training. Then, score the processed data
The code performs the following preprocessing on adult training and testing data:
-
Drop the following features: 'workclass', 'fnlwgt', 'education', 'marital-status', 'occupation', 'relationship', 'capital-gain', 'capital-loss', 'hours-per-week', 'native-country'
-
Map:
- 'race', 'sex' and 'class' values to 0/1
- ' White': 1, ' Amer-Indian-Eskimo': 0, ' Asian-Pac-Islander': 0, ' Black': 0, ' Other': 0
- ' Male': 1, ' Female': 0
Find further details in Kamiran, F. and Calders, T. Data preprocessing techniques for classification without discrimination
-
Split 'age' and 'education' columns into multiple columns based on value
# define the preprocess function to prepare the data for scoring
def preprocess(training_data):
if len(training_data.columns)==15:
# drop 'fnlwgt' column
training_data = training_data.drop(training_data.columns[2], axis='columns')
training_data.columns = ['age',
'workclass',
'education',
'education-num',
'marital-status',
'occupation',
'relationship',
'race',
'sex',
'capital-gain',
'capital-loss',
'hours-per-week',
'native-country',
'class']
# filter out columns unused in training, and reorder columns
training_dataset = training_data[['race', 'sex', 'age', 'education-num', 'class']]
# map 'sex' and 'race' feature values based on sensitive attribute privileged/unpriveleged groups
training_dataset['sex'] = training_dataset['sex'].map({
' Female': 0,
' Male': 1
})
training_dataset['race'] = training_dataset['race'].map({
' Asian-Pac-Islander': 0,
' Amer-Indian-Eskimo': 0,
' Other': 0,
' Black': 0,
' White': 1
})
# map 'class' values to 0/1 based on positive and negative classification
training_dataset['class'] = training_dataset['class'].map({' <=50K': 0, ' >50K': 1})
training_dataset['age'] = training_dataset['age'].astype(int)
training_dataset['education-num'] = training_dataset['education-num'].astype(int)
# split age column into category columns
for i in range(8):
if i != 0:
training_dataset['age' + str(i)] = 0
for index, row in training_dataset.iterrows():
if row['age'] < 20:
training_dataset.loc[index, 'age1'] = 1
elif ((row['age'] < 30) & (row['age'] >= 20)):
training_dataset.loc[index, 'age2'] = 1
elif ((row['age'] < 40) & (row['age'] >= 30)):
training_dataset.loc[index, 'age3'] = 1
elif ((row['age'] < 50) & (row['age'] >= 40)):
training_dataset.loc[index, 'age4'] = 1
elif ((row['age'] < 60) & (row['age'] >= 50)):
training_dataset.loc[index, 'age5'] = 1
elif ((row['age'] < 70) & (row['age'] >= 60)):
training_dataset.loc[index, 'age6'] = 1
elif row['age'] >= 70:
training_dataset.loc[index, 'age7'] = 1
# split age column into multiple columns
training_dataset['ed6less'] = 0
for i in range(13):
if i >= 6:
training_dataset['ed' + str(i)] = 0
training_dataset['ed12more'] = 0
for index, row in training_dataset.iterrows():
if row['education-num'] < 6:
training_dataset.loc[index, 'ed6less'] = 1
elif row['education-num'] == 6:
training_dataset.loc[index, 'ed6'] = 1
elif row['education-num'] == 7:
training_dataset.loc[index, 'ed7'] = 1
elif row['education-num'] == 8:
training_dataset.loc[index, 'ed8'] = 1
elif row['education-num'] == 9:
training_dataset.loc[index, 'ed9'] = 1
elif row['education-num'] == 10:
training_dataset.loc[index, 'ed10'] = 1
elif row['education-num'] == 11:
training_dataset.loc[index, 'ed11'] = 1
elif row['education-num'] == 12:
training_dataset.loc[index, 'ed12'] = 1
elif row['education-num'] > 12:
training_dataset.loc[index, 'ed12more'] = 1
training_dataset.drop(['age', 'education-num'], axis=1, inplace=True)
# move class column to be last column
label = training_dataset['class']
training_dataset.drop('class', axis=1, inplace=True)
training_dataset['class'] = label
return training_dataset
Process the training data
This code uses the preprocess function to prepare the data.
# use the preprocess function to prepare the data
processed_dataset = preprocess(training_data)
# drop class column
processed_dataset.drop('class', inplace=True, axis='columns')
processed_dataset.head(10)
Create data payload for scoring
This code creates the scoring data set.
# create data payload for scoring
fields = processed_dataset.columns.values.tolist()
values = processed_dataset.values.tolist()
scoring_dataset = {client.deployments.ScoringMetaNames.INPUT_DATA: [{'fields': fields, 'values': values}]}
import json
print("Scoring data: ")
scoring_formatted = json.dumps(scoring_dataset, indent=2)
print(scoring_formatted)
Score the model
This code sends a scoring request to the model using the scoring_dataset. You will need to include your online deployment ID in this code. Follow these steps to find the online deployment ID.
- Navigate to your deployment spaces.
- Open your deployment space.
- Click the Deployments tab.
- Open your online deployment.
- In the Information pane, copy the Deployment ID, and paste it in place of
<insert-your-online-deployment-id-here>
# score data
prediction = client.deployments.score('<insert-your-online-deployment-id-here>', scoring_dataset)
print("Predictions and probabilities: ")
prediction_formatted = json.dumps(prediction, indent=2)
print(prediction_formatted)
Check your progress
The following image shows the predictions and probabilities from the completed scoring request.

Next steps
Ready to create your own customized Federated Experiment? See the high level steps in Creating your Federated Learning experiment.
Parent topic: Federated Learning tutorial and samples