SPSS Modeler is a data mining application, where you can build SPSS Modeler flows to analyst data and create predictive models by using the visual interface.
New to building SPSS Modeler flows?
- For a quick overview of how to make a flow, see Building your first flow.
- For a quick tutorial to get you started, see Build a model using SPSS Modeler.
- For more tutorials with sample data to practice on, see Tutorials.
- For an overview of the modeling process and working in SPSS Modeler, see Mining data in SPSS Modeler.
The provided tutorials help you develop your skills and highlight SPSS Modeler's vast capabilities.
You can also watch the following short video for a few modeling examples. This video provides a visual method to learn the concepts and tasks in the documentation.
Video disclaimer: Some minor steps and graphical elements in the video might differ from your platform.
Building your first flow
If you are new to building flows in SPSS Modeler, follow these steps to make your first flow.
- Open a project and go to the Assets tab.
- Click New asset and pick Build models as a
visual flow to add an SPSS Modeler
flow.
- Type a name and description for your flow.
- If you use a sample flow with data, click Sample and pick one of the samples.
- If you want to create a flow from locally saved .str file, click Local file and upload the file.
- Click Create to create the new flow.
- If you want to use your own data and it isn't already part of the project, click
New asset again and find your data to add it to your
project's data assets.
For more information about the file types that are supported, see Supported data sources for SPSS Modeler.
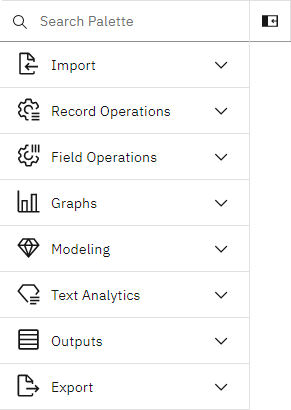
- Drag nodes to the canvas from the node palette.
For a detailed description of each node, see Nodes palette.
Figure 1. Node palette 
- Double-click a node to set its properties.
- To connect nodes, click the small empty circle icon on a node and drag it to the
node you want to connect it to.
Figure 2. Connecting nodes 
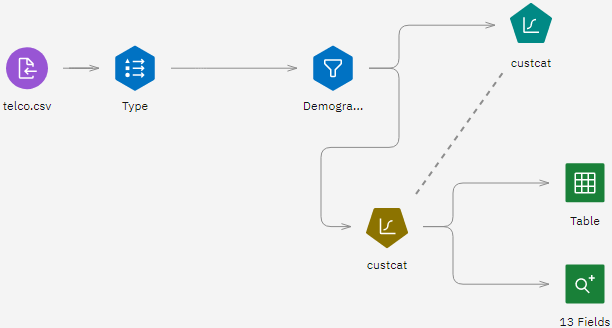
- Continue to add and connect nodes to create your flow.
Figure 3. Creating a flow 
Working with your flow
After you build your flow, you can use it to explore your data and run models. The following tasks are just a few of the things that you can do with your new flow
- If you want to preview the data in the flow, hover over a node. Click the
overflow menu
 , and then select
Preview Data.
 If you want to examine your data more thoroughly, use a Charts node to open the chart builder. In the chart builder, you can use advanced visualizations to explore your data.
- If you want to group related nodes together into a Super Node, Ctrl-click the
nodes that you want. Hover over a node and select Create
SuperNode.
A SuperNode turns a group of nodes into a reusable node that you can more reuse easily across your flow.
- If you want to run the whole flow, click Run all.
After a flow finishes running, a new model nugget is generated. You can hover over the model nugget, click the overflow menu
 , and then select View Model to
explore the output.
 - If you want to run only a terminal node and not the entire flow. Click a node and then click Run selected.
- If you want to view the results of an Outputs node (such as a
Table node), click the Outputs and
models icon after the flow runs.
In the side panel, on the Outputs tab, click the object, such as a table, to open it.
- If you want to save a version of a flow, click the View versions icon. In the side panel, click New version.
- If you want to download a flow as an SPSS Modeler
stream file (.str), click the Download
stream icon
 .
.